Baked Apples!

baked apples

OK.  Yum.  Yummity-yum-yum YUM.

We like dessert after dinner at my house.  I shoot for fresh fruit most nights but lately Valentine candy (shoot me now) has been dessert.  When I can find a nice fairly healthy dessert I consider it a great accomplishment as it makes everyone smile, including me (and no shooting required.)

Bonus number two with this particular recipe: both of my daughters can make it single-handedly!  I kinda prefer when Josie makes it because she cleans up her work space without any evidence of food preparation lickity-splickity.  Rhea needs a reminder.  And then sometimes another reminder.  And then I go back and finish the clean up.  But that’s OK.  This is why kiddos have mamas, right?   We’ll get there.
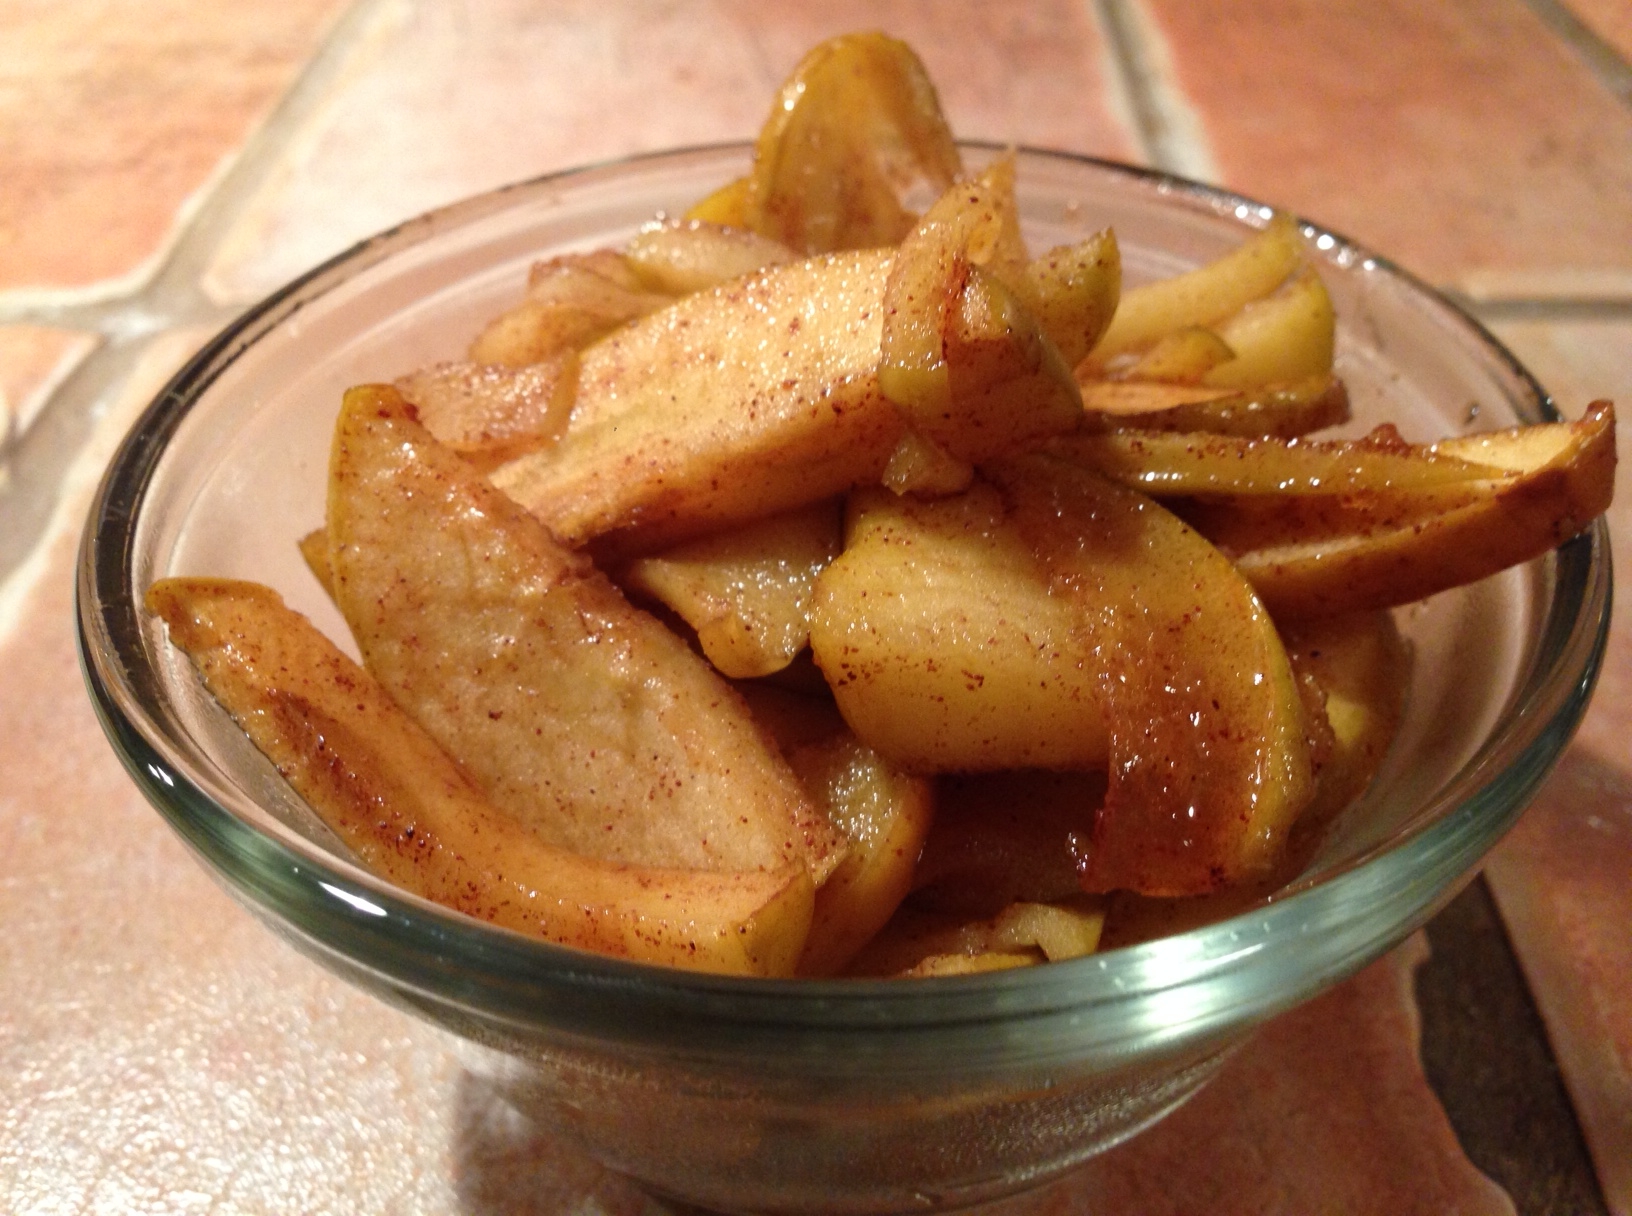
Baked Apples

Ingredients: 4 apples, 2 tbsp. maple syrup, few shakes cinnamon.

Directions: slice up your apples and leave the skins on.  Pour on syrup and add the cinnamon.  Mix it all up so all the slices are coated evenly.  Bake at 400 for about 30 minutes if you like your apples cooked but a bit firm, longer if you like them softer.  Serve warm in a little bowl because then your dessert can be tasty and cute.

Unsolicited tips: There a tons of other ingredients you can use for baked apples.  Brown sugar, butter, vanilla… but I like this recipe because it’s simple and really tasty–plus way healthier without all that other stuff.  Most of the recipes I found online for baked apples directed me to peel the fruit.  This, however, is not only an added step, it also simultaneously removes one of the most nutritious parts of the food!  So, if you need to peel’m.  If not, don’t!  My guys love it with the skin on.

Final tip: most recipes called for more maple syrup, but I have found that a little bit is all you need to add some sweetness but not overpower the other flavors.

If you’re interested in health benefits of cinnamon and maple syrup consider yourself thus informed!

Advertisement

Waffles. Mmm… Yes.

waffle

Ahhh… winter break.  Vacation.  Lazy mornings.  Waffles.

Just a peek into Michelle’s train of thought on this crisp (OK, yes: by So-Cal standards) Sunday morn.

You may notice that my waffles are stacked.  In a pile.  A BIG pile.  It’s rather a bit of work to make waffles.  Pancakes and French toast are easier as I can grab my handy-dandy double burner griddle and whip up those little honeys six at a time.

Not so with waffles.  One.  At.  A.  Time.  That’s how you do waffles.  So if I’m in waffle mode I capitalize on the vibe.  The extras will either sit in the fridge for toasting up over the next few days, or slip into the freezer for a future breakfast of fun.

Just in case you’re wondering, I have done a fair bit of breakfast recipe searching.  These waffles are dang tasty.

Michelle’s Buttermilk Waffles

Ingredients: 2 cups whole wheat flour,  1 tsp each of these: baking powder, baking soda, salt, 2 eggs, 2 cups buttermilk, dash vanilla, 1/2 cup vegetable oil.

Directions: mix it up and pour into your waffle iron.  Even though my waffle iron has a non stick surface (I’ve never seen one any other way) I still brush a little oil on both sides between every pour.  Top with maple syrup, honey, powdered sugar, jam… so many lazy mornings ahead, so many waffle topping options!

Tips: Double the above recipe and then you can just pour that skinny carton of buttermilk right in as it’s four cups!

Gluten free friends: I substituted the wheat flour in Josie’s waffles with Pamela’s Gluten/Wheat free pancake mix/flour.  Worked fine and they taste great–although they did cook a heckuva lot faster than the other ones.  Just a heads-up.

Breakfast Introspection

breakfast

Before I begin, check out my monthly post on Hometown Pasadena!

Tomorrow my youngest child turns six.  Of course he’s all excited about getting older (OK, yes, and getting presents.)  For whatever reason, I always get a little teary the day before my children celebrate another year of life.  My mind drifts back to what I was doing the day before they were born.

In Grayson’s case, with a scheduled C-section, six years ago today, I knew it was the last day of my pregnancy.  With a one-year-old and two-year-old at home with me (I know, right?), being a 38 year-old pregnant woman with a 10 lb. baby in my belly I was mostly focused on gettin’ that kid out.  FAST.  I seem to recall a tearful checkup with my OB where I pretty much begged him to move up my delivery date by a week as I just didn’t think I would make it to the finish line.  He didn’t.  I did.

The aching back, insomnia, swollen feet and baby shoved so far up my rib cage I couldn’t bend forward to even wash the dishes by this point… all those memories have dissipated by now.  Mostly now I think back and realize that six years ago today I was pregnant for the last time in my life.

I felt then and still do feel so incredibly lucky to have carried three amazing little people in my belly.  From the first to the third I marveled at them from the moment I looked into their brand new eyes.  I kept them in the hospital room with me and despite exhaustion and the opportunity to rest before returning home, even with my not-so-little guy I held him and gazed at him constantly.  Just couldn’t get over the miracle of the whole thing.  Still can’t, really.

Tomorrow I’ll be awakened early–I know it–by an eager kindergartener who can’t wait a moment longer to open his gifts.  But today I will sip my coffee for just one extra minute and bask in these quiet memories.

Introspection French Toast

Ingredients: for every 3 eggs, 1/4-1/3 cup butter milk, dash of sugar, dash of vanilla, 1/2 dash almond extract, few shakes cinnamon.  Bread of any kind. (I don’t really measure–sorry Teri and Lisa.  These measurements should work though!)

Directions: Put bread aside.  Mix everything else together.  Dip bread into mixture and cook on griddle.  Serve with butter and real maple syrup whenever possible.

Tip: I often make this recipe with a dozen eggs and an entire loaf of bread.  Freezes great, pop it in the toaster and wah-lah!  French toast any time you want.  Life contemplation is optional.

I Couldn’t “BEET” This One

beets

OK, so Jennifer got me.  This Once Upon a Chef inspiration really got me with her balsamic glazed roasted beets.

Developing one’s personal arsenal of recipes rarely begins from scratch.  These days it’s just too easy to see what all the other foodies are up to out there!

Usually I make a new recipe by following the prescribed rules (OK, yes, mostly following the rules.)  It just makes sense and there’s almost a sense of ‘honoring’ the original creator–although as most recipes have been borrowed and tweaked from hand to hand who knows where it really all began?

But I have my own take on kitchen concoctions and love to play around with possibilities… I enjoy adding more of this or substituting that to see if I can “Michelle-ize” the recipe.  Hey, we all get our kicks in different ways…

This recipe for beets, however–as many simple recipes are–is absolutely perfecto as-is.  I would not change one single solitary thing.

I made it.  We ate it.  We wanted more.

Also, as Jennifer states on her blog, the glaze is actually good enough to drink.  My girls greedily scooped it up with their spoons and slurped down every last drop.

Balsamic Glazed Roasted Beets

Ingredients: Approx. 6 med. beets, salt, olive oil, maple syrup and any balsamic vinegar (don’t go fancy-vinegar here, doesn’t matter)

Directions: Clean, peel (if you like) and cube the beets.  Place on a cookie sheet and drizzle with olive oil/sprinkle with salt.  Roast at 400 degrees for about 40 minutes or until beets are cooked.

As beets are finishing up, heat 1/3 cup vinegar and 1 tbsp. maple syrup on stove top.  Stir constantly as it will heat quickly and you don’t want to burn the sugars.

When the beets are done, simply pour glaze over the top and dig in.

Tips: I used golden beets because that’s what I had.  Although my five-year-old son swears he can tell the difference between red or yellow beets, the rest of the family agrees we cannot.  We don’t argue with Grayson though.  It’s not worth it.

Nutrition info if ya wanna know: Besides magnesium, calcium and iron, beets contain significant amounts of folic acid which helps in the production of new cells.  Beets have also been linked to prevention of cancer, especially colon cancer.

(Also, my girls would like me to point out that it’s very exciting–after eating red beets–to see that your pee has turned pink.  Hey, like I said, we all get our kicks in different ways.)